Who doesn't love pizza? This is such a great recipe and is really easy to make. You'll be able to make and bake two pizzas in about an hour - or chill the second half of the dough and have pizza again later in the week!
You have choices with your ingredients here... if you want organic, use organic! If you want Pizza Margherita, use fresh mozzarella sliced thin with fresh basil. Meat lover? Go on ahead! This also makes a great dough for calzones, though you may need to add some minutes to your baking time.
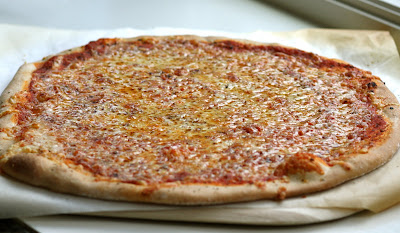
Thin Crust Whole-Wheat Pizza
Ingredients (dough):
- 1 1/2 cups warm water
- 2 1/4 tsp yeast
- 2 TBSP Olive oil
- 2 tsp salt
- 1 tsp honey or raw sugar
- 1 cup whole wheat flour
- 2 1/2 cups bread flour
- Some corn meal for the bottom of the pizza (optional, but authentic!)
Ingredients (pizza toppings):
- Olive oil
- Sauce, about 1/4 cup - use can use tomato, or if your are making a white pizza, use dollops of ricotta and minced garlic. I like using organic strained tomato sauce that comes in a jar. It allows me to add my own spices to the crust prior to putting the sauce on.
- Cheese - about 1 1/2 cups, shredded. Or sliced, if you are having pizza margherita.
- Any other toppings you like on your pizza!
Materials:
- Stand Mixer w/ dough hook
- Parchment paper
- Rolling pin
- Pizza Stone. You can also used unglazed terra cotta tiles to cover the baking rack and give you a larger baking surface. OR in a pinch, use a large flat cookie sheet.
Directions:
- Place pizza stone on a low or middle rack of your oven. Preheat oven to 450 degrees F. Let the oven preheat for at least 45 minutes prior to putting your pizza in the oven. This allows the stone to get nice and hot - which will give you a crisper crust to hold all those lovely toppings.
- Place all above ingredients into the bowl of your stand mixer. With dough hook attachment, mix on low until dough comes together. Then switch to "2" and mix for another 8-10 minutes. This allows the gluten to build up in the pizza dough. Don't worry if the dough "hugs" the hook the entire time - it is still getting a work out!
- When finished mixing, coat the dough lightly in olive oil and allow it to rest in the bowl (covered) for 10-30 minutes. I've used the dough after resting only 10 minutes, and it still works really well!
- Cut the dough in half. If you won't be making both pizzas immediately, then refrigerate the second piece in a sealed container or plastic bag.
- Lightly flour a clean surface. Press the dough into a large flat circle with your hands. Let rest for 5 minutes while you get all of your toppings and spices out.
- Take a large square of parchment paper and sprinkle with corn meal. Place your dough on the paper and begin to roll - working from the middle of the dough, outwards, and turning the paper/dough while you work. If it sticks at all, lightly flour your rolling pin as you work. I like to leave the dough slightly thicker at the edges so that the crust puffs up nicely. (If you want a thicker, dough-ier crust, then simply stretch the dough with your hands, let it rest, and stretch/press some more. The pie won't be as big, but it will be that much more filling per slice!)
- Use a little olive oil to brush over the crust - especially coating the outside edge.
- Add spices to your crust if desired. I like to use dried basil and oregano, and sometimes some garlic salt.
- Add sauce to the crust and spread around with the back of a spoon. Don't use too much, or the crust may not crisp up as much as you desire it to. About 1/4 cup should be plenty.
- Sprinkle on toppings and cheese.
- Slide the parchment and pizza onto a pizza peal or the back of a cookie sheet to help transfer to the oven. (YES - bake the pizza right on the parchment paper - it won't burn if you are baking for this short amount of time, and it makes the dough easier to transfer in and out of the oven.)
- Bake for 10 minutes. Let cool for 3-4 minutes before slicing!


