Showing posts with label Main Dish. Show all posts

Tuesday, October 19, 2010

Indian Butter Chicken

My husband and I have found a wonderfully addicting alternative to "going out"... it's called "cooking in". Imagine that! We attempt to make our favorite dishes that we love to have when eating out. Hey... we're all saving pennies these days, and although it's not as nice as having an evening out of the kitchen, it's fun to have our favorite restaurant's famous fare (well, almost!). A few months ago, my husband and I went out for Indian. I played it safe and had my usual "red curry (coconut) chicken". It was really good! But my husband also had a really nice dish called "Kashmiri Chicken". It was a new dish for both of us, and we loved how silky the sauce was, and how the spices were balanced with a bit of sweet taste. I started looking for recipes when I got home that evening. I didn't have much luck. It turns out that Kashmiri is not really a cooking term, but a regional description of a chicken dish. During my search I found a lot of recipes for a dish called Butter Chicken. And as I was reading ingredient lists I noticed that Indian Butter Chicken seemed to have some similar tastes as to what we had had that evening at the restaurant. (And if there are any Indian food "critics" reading this, first of all... thank you for reading?! and second of all, forgive my naivete for thinking these dishes might be similar!)

The next week rolled around and I decided to try my hand at making Kashmiri Chicken. I started with a basic Indian Butter Chicken recipe and altered it for what I could find/not find and how I thought the recipe would change from Butter Chicken to the Kashmiri dish that we had at the restaurant. I also like a medium heat range when it comes to spices... not wimpy, but not painful either, so I altered the spices just a bit. We loved this dish the way that it turned out and have made it multiple times since then! Perfect comfort food that is certainly healthier than fast food!


Indian Butter Chicken
Adapted from Allrecipes.com to taste like the Kashmiri dish we had from the restaurant.
Serves 4

Ingredients:
  • ----------SAUCE-----------
  • 1 Tbsp Coconut Oil (or peanut oil)
  • 1 shallot, diced
  • 1/4 onion, diced
  • 2 Tbsp butter
  • 2 tsp lemon juice
  • 1 Tbsp green curry paste
  • 1/4 tsp fresh grated ginger (I buy it in the jar)
  • 1 tsp garam masala (I made my own - it made enough for 3 recipes)
  • 1 tsp chili powder
  • 1 tsp ground cumin
  • 1 Bay leaf
  • 1/4 cup plain yogurt
  • 1 cup half and half
  • 1 cup tomato puree
  • 1/4 tsp cayenne pepper
  • 1 pinch salt (I used Kosher salt, so added 1/2 tsp)
  • 1 pinch black pepper
  • 2 Tbsp creamy peanut or almond butter
  • 1/4 cup golden raisins
  • topping for dish: roasted salted cashews - about 2 Tbsp
  • ----------CHICKEN-----------
  • 1 Tbsp coconut oil
  • 1 lb. boneless, skinless chicken thighs, cut into small pieces
  • 1 tsp garam masala
  • 1 pinch cayenne pepper
  • OR - this is great with left over roasted chicken as well. I still sprinkle it with seasonings before adding it to the sauce at the end.
  • ----------RICE----------
  • 1 part rice - 2 parts water
  • I used about 1/2 cup brown rice, rinsed well

Directions:
  • If serving this dish over rice, get it started first as it usually takes 30-45 minutes depending on cooking methods. I like to use my rice cooker. I measure out the rice, put it in the basin of the cooker and rinse it well (at least twice) by scrubbing the rice with my palm and fingers to wash off the extra starch. This really does make a difference - especially with brown rice. It will cook up more fluffy and not lump itself together. Drain the water as best as you can, then add twice the amount of fresh water as dry rice. Start your rice cooker.
  • To make the sauce: heat 1 Tbsp coconut oil in a large sauce pan over medium high heat. Saute shallot and onion until soft and translucent, not brown.


  • Stir in butter, lemon juice, green curry paste, grated ginger, 1 tsp garam masala, chili powder, cumin and bay leaf. Cook, stirring one minute.


  • Add tomato sauce, and cook for 2 minutes, stirring frequently.
  • Stir in Half-and-half, yogurt, peanut or almond butter, and raisins. Reduce heat to low and simmer for 10 minutes, stirring frequently.
  • Season with salt and pepper. Remove from heat and set aside.


  • To cook the chicken: heat 1 Tbsp coconut oil in a large heavy skillet over medium heat. Cook chicken until lightly browned, about 10 minutes. Reduce heat and season with 1 tsp garam masala and cayenne. Stir in a few spoonfuls of sauce, and simmer until the liquid has reduced and chicken is no longer pink in the center.
  • Stir cooked chicken into sauce.
  • **If the sauce is too thin (mine never is, but this is per the original recipe) you can mix 1 Tbsp of cornstarch into 1/4 cup of water and mix into the sauce. Simmer until it starts to thicken, 5-10 minutes.




Saturday, September 11, 2010

"Wings" with Orange Chipotle BBQ Sauce


Confession: this isn't the recipe that I really wanted to be making tonight. You see, ever since I sat down for dinner at a Stone Harbor, NJ seafood shack called Quahogs and took a bite of their Pacu fish ribs (Yes... FISH ribs), I've been thinking about the meal ever since. Let me repeat... FISH ribs. They looked just like pork ribs, but were cut from the belly of a Brazilian fish that grows to be 60 pounds. Smothered with a delicious BBQ sauce and grilled lightly... the meat just fell off the bone. But I digress. I have to "call by Tuesday" if I want my Pacu by the weekend from my seafood guy at the local market.

Even though I couldn't get ahold of the Pacu fish this weekend, I decided I can first start to work on the wonderful Orange Chipotle BBQ sauce that the chef at Quahog's makes to marinate them in. I decided to make some wings for "game night". And although Penn State is losing to the big Alabama Tide as I write this, I am at least glad that the sauce is a winner so far. I'm not a huge fan of bony wings with no meat, so I went straight for the meatier chicken drumstick. My favorite brand of packaged fresh chicken right now is Bell and Evans. They have five chunky drumsticks (raised without antibiotics or growth hormones) packaged for less than $4. I used two packs and the sauce I made was plenty to accommodate them. So although I wasn't able to make my ribs - I'll just have to let it go until next weekend - it was good practice for me and a wonderful sauce for "wings" if you plan on making them.

Orange Chipotle BBQ Sauce

Ingredients:
  • 1 cup Orange Juice
  • 1 cup Ketchup
  • 2 TBSP brown sugar
  • 1 1/2 TBSP chipotle Tabasco sauce
  • 1 TBSP Worcestershire sauce
  • 1 TBSP apple cider vinegar
  • 1/2 tsp onion flakes
  • 1/2 tsp garlic powder
  • ---------------------------
  • 1/4 cup honey
Directions:
  • In a saucepan, reduce orange juice by half, stirring often, until is starts to thicken.
  • Add the rest of the ingredients, except honey, and stir until it just starts to "pop", or boil.

Place drumsticks, or wings, in a gallon sized baggie and pour sauce over top. Let marinate for 3 hours (minimum) to overnight.

Preheat oven to 350 degrees F. Spray or butter a 9X13 baking dish and arrange wings (and all the marinade you can squeeze out of the bag) so that they lay in a single layer. Bake for 50-60 minutes, turning once and basting with sauce and 1/4 cup of honey about half way through. Another confession: I took these out early around 40 minutes thinking they'd be done (when picture was taken). I decided to put them back in for the extra time - for me 60 minutes - and I was glad I did. The sauce thickened and the meat didn't lose any moisture! It may be less time for those of you using a smaller drumstick or frozen wings.

This sauce was sweet, smokey, and tangy. Perfect for wings, or when you can get it from your trusty fish monger... Pacu fish ribs. ;0)

Friday, August 13, 2010

Vegan/Veggie Burger


Recently I had a good friend tell me that she and her husband were making the switch to veganism. They went from being meat eaters to vegan over-night... and all because of having read a book called The China Study. I have not read the book yet. But I've heard about it and have read about others making changes in their diets because of it. (Perhaps it should be on my must-read list?) Then again, maybe there are things that I'd like to stay naive about just a little bit longer... I'm not sure that I could live without ice-cream, yogurt, cheese, and eggs. I've been a non-red meat eater for 16 years. I even dabbled in vegetarianism for about 8 months one year. Even now, I don't eat a lot of meat, but I do enjoy small amounts of poultry, fish, and seafood. And I cook about 2-3 vegetarian (not necessarily vegan) meals a week. Even as a meat eater, it is hard to deny the knowledge that eating "alive" and whole food is simply healthier for your body. It just makes sense. The fruits, vegetables, and greens that we eat are filled with life and nutrients that are given to us directly from the earth itself. It's where we get our natural vitamins. And it's exciting to know that there are sources of protein - something our body does need and crave - that we can get from non-meat sources. So in honor of that, and in honor of this huge life change that my friends are diving headfirst into, I am at least vowing to explore some vegan as well as more vegetarian meals. I almost succeeded in the vegan meal tonight,but couldn't resist slapping a slice of yummy melty sharp cheddar onto my vegan burger. ;0) I'll get there!

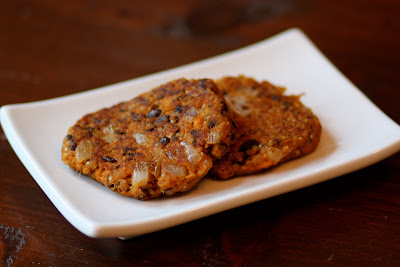
The burgers I made tonight were soft, sweet, and yummy. We grilled them in a pan with a little olive oil spray and served them without a roll, along with a side salad. I did stray from the recipe a bit as far as spices. I wanted my 2.5 year old to still enjoy them. You can always kick the spice up a notch if you aren't feeding delicate palates! Follow the link to the original recipe to see what they added, spice wise. I also am upping the amount of quinoa that it calls for. The burger needed a bit more grain to hold the patty together.


Quinoa, Black Bean, and Sweet Potato Burgers
Lightly adapted from fatfreevegan.com

Ingredients:
  • 1 medium onion, diced
  • 3-4 cloves of garlic, minced
  • 1 carrot, finely grated
  • 1 can of black beans, washed and drained
  • 1/2 of 1 baked sweet potato, flesh scooped out (or 3/4 cup canned)
  • 1/2 cup Quinoa (uncooked). Make sure to choose a brand that is pre-rinsed or you will need to sort (for rocks) and rinse off the sour coating on the grain. Try "Ancient Grains"brand for a nice pre-rinsed Quinoa.
  • 2/3 cup bread crumbs
  • 2 TBSP ketchup
  • 1 tsp balsamic vinegar
  • 1 tsp cumin
  • salt and pepper to taste
Directions:
  • An hour before you make the burgers, wrap your sweet potato in aluminum foil and bake for one hour at 400 degrees F. You can use a toaster oven if you have one.
  • Place dry quinoa with 1 cup of water into a sauce pan with lid. Bring to a boil, then turn heat back to a low simmer. Simmer, covered, for 10-12 minutes or until all the water is absorbed.
  • Saute onion and garlic with a little olive oil. If you are using jarred minced garlic instead of fresh, add the garlic at the very end when the onions have turned translucent.
  • Add beans to the same pan and cook for 2 minutes more.
  • Turn off heat. Lightly mash about half of the beans.
  • Combine all the ingredients into a large bowl and mix until well-combined. Form into patties. It will make 4-5 patties.
  • Lightly spray a skillet with olive oil (and spray top of burger before flipping) and fry until brown on each side.


My little bunny rabbit... liked her veggies and vegan burger.

Thursday, July 29, 2010

Zucchini "Crab" Cakes


Wondering what to do with all of that zucchini that is over-flowing your garden at the moment? This is a great way to use up some of the extras (or maybe one that got too big!).

It is usually around the end of July that home gardeners start pulling out their really "creative" recipes to use up the extra bounty from their vegetable patches. My Mom always used to make us zucchini pancakes and zucchini bread to try to use up her extras - and as kids, we appreciated the effort! Here is another twist on a zucchini "substitute" to throw into your repertoire.

**The trick to making this recipe successful is draining your zucchini to get the excess water out of it. I use my food processor to grate the zucchini, but you can use any hand held grater as well. I then throw all the grated zucchini into my salad spinner and sprinkle on a tsp of salt. The salt will help to draw out the moisture. I let it sit for 15-20 minutes before spinning the extra moisture out. If you don't have a salad spinner, line a colander with paper towels and let it drain that way. With either method, you may want to squeeze the grated zucchini with some paper towels after the draining period to get any extra water out before starting the recipe.

Zucchini "Crab" Cakes
Adapted from the infamous "Connie's" recipe

Ingredients:
  • 2 1/2 cups grated zucchini (about one large, or two small)
  • 1 egg, beaten
  • 2 TBSP butter, melted
  • 1/4 cup minced onion
  • 1 1/4 cups bread crumbs (regular)
  • 1 1/2 tsp Old Bay Seasoning
  • 1/2 tsp dried thyme leaves
  • 1/2 tsp salt
  • 1/4 tsp pepper
  • 1/4 cup all-purpose flour (for dredging right before frying)
  • 1/2 cup coconut oil (or vegetable oil) for frying
Directions:
  • Grate and drain your zucchini (see tip above recipe)
  • In a large bowl combine zucchini, onion, whisked egg, and melted butter.
  • In another bowl combine bread crumbs and seasonings.
  • In a cast iron, or heavy bottomed skillet, melt your cooking oil on medium heat.
  • Combine zucchini mixture with the bread crumbs and mix well. Shape mixture into patties. Immediately dredge with flour, and fry in skillet until golden brown on both sides. Drain on paper towels before serving.
Quick and easy remoulade:
  • 1/4 cup Mayonaise
  • 2 TBSP Ketchup
  • 1/2 tsp Old Bay Seasoning
  • 1-2 shakes of hot sauce

Zucchini "Crab" Cakes are great served with a Tomato, Avocado, and Corn salad, or with this Potato and Mushroom salad!


Tuesday, July 20, 2010

Zucchini Casserole


This little creation was a "fridge clean-up" for me last night... But I think I'll keep it in the current round of awesome summer side-dishes, just for how yummy it turned out. It was light and healthy, but flavorful. And it used all of the vegetables that are pouring out of people's gardens right now, so it shouldn't cost you that much to throw together!

Zucchini Casserole
6-8 side servings (or 4, if you use it as a main dish)

Ingredients:
  • 1 medium-large zucchini (or about 2 cups sliced)
  • 1 cup fresh or thawed sweet corn
  • 1/2 red pepper, diced
  • 1/4 medium onion, diced
  • 2 medium eggs
  • 1/2 tsp garlic salt
  • 2 TBSP half and half
  • 2/3 cup of bread crumbs (or two slices of wheat bread grated in food processor)
  • 2 TBSP freshly grated parmesan cheese
  • 2 TBSP butter, melted
Directions:
  • Preheat oven to 375 degrees F.
  • Lightly spray a 2 qt baking dish, or a deep dish pie plate.
  • Wash and cut ends off of your zucchini. With a food processor with the slicing blade (or use a mandolin) slice zucchini very thin (almost ribbon thin). Place slices in a large bowl with your diced peppers and onions.
  • Mix together your eggs, HnH, and garlic salt. Season with a pinch of pepper if you like. Whisk together well and pour over top of your vegetables. Stir together to coat the vegetables. Pour into your baking dish and spread them around in an even layer.
  • Sprinkle the top with your freshly grated parmesan cheese, then bread crumbs, then melted butter.
  • Bake for 45 minutes. Let cool 5 minutes before serving.

Monday, May 17, 2010

CousCous and Vegetable Stir Fry


This is an easy and healthy meal that takes less then 30 minutes to prep and prepare. It came into being one summer when my garden was overflowing with wonderful vegetables and we needed a quick dinner option. And nothing cooks more quickly than couscous! It recently made another blogger's "
Top 25 in under 20 minutes" meal list. This is a versatile dish and can easily be tweaked to fit your taste preferences!

Ingredients:

  • 1 box of any Couscous (Optional - preparing the couscous with chicken or vegetable stock to add flavor)
  • 3 cups of cut up vegetables – whatever you have laying around that you need to use up. I like to use onions, green and yellow zucchini/squash, and red peppers – great color, but great flavor too!
  • 3/4 cup frozen, shelled edamame
  • 1/4 cup Pine Nuts, toasted
  • olive oil
  • 3-4 TBSP grated parmesan cheese

Directions:

Lightly toast Pine Nuts in toaster oven or in a dry skillet

Slice up your vegetables and set aside. Prepare Couscous by bringing water to a boil WITH your frozen edamame in the pot. Add CousCous (And flavor packet if there is one. If not, add 1 tsp salt, and 1/4 tsp garlic powder if you have some) and stir. Pull off the heat and allow it to sit covered for the instructed amount of time.

Pre-heat a large skillet with about a TBSP of olive oil. Add your sliced vegetables, cover, and turn heat to low for about 3 minutes. This allows your vegetable to steam lightly. Uncover and finish stir-frying the vegetables on medium heat. Uncover and stir your Couscous and place into a large serving bowl (Optional: an extra drizzle of olive oil helps the couscous from sticking together in big clumps). Top with your stir-fried veggies, toasted pine nuts, and grated parmesan cheese.

**This is also a wonderful dish served cold, as a picnic dish or a side salad to a main dish. It can be made “vegan” by leaving out the parmesan cheese. You could also substitute the Couscous with wonderful, healthy Quinoa, or even a wheat pasta if you don’t keep Couscous in the pantry!


Sunday, May 16, 2010

Thin Crust Whole-Wheat Pizza


Who doesn't love pizza? This is such a great recipe and is really easy to make. You'll be able to make and bake two pizzas in about an hour - or chill the second half of the dough and have pizza again later in the week!

You have choices with your ingredients here... if you want organic, use organic! If you want Pizza Margherita, use fresh mozzarella sliced thin with fresh basil. Meat lover? Go on ahead! This also makes a great dough for calzones, though you may need to add some minutes to your baking time.

Thin Crust Whole-Wheat Pizza

Ingredients (dough):
  • 1 1/2 cups warm water
  • 2 1/4 tsp yeast
  • 2 TBSP Olive oil
  • 2 tsp salt
  • 1 tsp honey or raw sugar
  • 1 cup whole wheat flour
  • 2 1/2 cups bread flour
  • Some corn meal for the bottom of the pizza (optional, but authentic!)
Ingredients (pizza toppings):
  • Olive oil
  • Sauce, about 1/4 cup - use can use tomato, or if your are making a white pizza, use dollops of ricotta and minced garlic. I like using organic strained tomato sauce that comes in a jar. It allows me to add my own spices to the crust prior to putting the sauce on.
  • Cheese - about 1 1/2 cups, shredded. Or sliced, if you are having pizza margherita.
  • Any other toppings you like on your pizza!
Materials:
  • Stand Mixer w/ dough hook
  • Parchment paper
  • Rolling pin
  • Pizza Stone. You can also used unglazed terra cotta tiles to cover the baking rack and give you a larger baking surface. OR in a pinch, use a large flat cookie sheet.
Directions:
  • Place pizza stone on a low or middle rack of your oven. Preheat oven to 450 degrees F. Let the oven preheat for at least 45 minutes prior to putting your pizza in the oven. This allows the stone to get nice and hot - which will give you a crisper crust to hold all those lovely toppings.
  • Place all above ingredients into the bowl of your stand mixer. With dough hook attachment, mix on low until dough comes together. Then switch to "2" and mix for another 8-10 minutes. This allows the gluten to build up in the pizza dough. Don't worry if the dough "hugs" the hook the entire time - it is still getting a work out!
  • When finished mixing, coat the dough lightly in olive oil and allow it to rest in the bowl (covered) for 10-30 minutes. I've used the dough after resting only 10 minutes, and it still works really well!
  • Cut the dough in half. If you won't be making both pizzas immediately, then refrigerate the second piece in a sealed container or plastic bag.
  • Lightly flour a clean surface. Press the dough into a large flat circle with your hands. Let rest for 5 minutes while you get all of your toppings and spices out.
  • Take a large square of parchment paper and sprinkle with corn meal. Place your dough on the paper and begin to roll - working from the middle of the dough, outwards, and turning the paper/dough while you work. If it sticks at all, lightly flour your rolling pin as you work. I like to leave the dough slightly thicker at the edges so that the crust puffs up nicely. (If you want a thicker, dough-ier crust, then simply stretch the dough with your hands, let it rest, and stretch/press some more. The pie won't be as big, but it will be that much more filling per slice!)
  • Use a little olive oil to brush over the crust - especially coating the outside edge.
  • Add spices to your crust if desired. I like to use dried basil and oregano, and sometimes some garlic salt.
  • Add sauce to the crust and spread around with the back of a spoon. Don't use too much, or the crust may not crisp up as much as you desire it to. About 1/4 cup should be plenty.
  • Sprinkle on toppings and cheese.
  • Slide the parchment and pizza onto a pizza peal or the back of a cookie sheet to help transfer to the oven. (YES - bake the pizza right on the parchment paper - it won't burn if you are baking for this short amount of time, and it makes the dough easier to transfer in and out of the oven.)
  • Bake for 10 minutes. Let cool for 3-4 minutes before slicing!

Monday, May 10, 2010

Spinach and Bacon Quiche


My family and I have been frequenting our indoor farmer's market on the weekends. It has such a wonderful selection of locally grown/made items, including; (often organic) vegetables, leafy greens, meats, cheeses, eggs, and sometimes even ice-cream! We've been lucky to find a local source for free-range, grass-fed, antibiotic-free hen-laid eggs. You open the cartons to find eggs in such a beautiful and varying array of colors and sizes! I often buy two dozen at a time just to keep up with all the home baking and cooking we've been doing. If I get to the end of a week and have a lot of eggs left over, I'll sometimes make a quiche. It makes the perfect quick-fix for a dinner or lunch, and you can basically put anything you like (or have leftover) into the quiche!

This is a doctored version of a recipe found on the Food Network channel.

Spinach and Bacon Quiche
adapted from Paula Deen
8 servings

Ingredients:
  • 5 large eggs, beaten
  • 1 1/4 cups of Half and Half
  • 1/4 tsp salt, dash of pepper
  • Pinch of nutmeg
  • 2 Cups chopped fresh baby spinach, packed
  • 1 pound turkey bacon, cooked and crumbled/chopped
  • 1 1/2 cups shredded cheese (I like to use a mix of swiss and cheddar)
  • 1 (9 inch) pie crust, fitted to a 9-inch pie plate (*read more on this at the bottom of recipe)
Directions:
Preheat the oven to 375 degrees F.
Cook bacon and let cool. Then crumble or chop into small pieces.
Spray your pie plate with cooking spray, then fit pie crust into your pie plate.
Combine the eggs, Half and Half, salt, pepper, and nutmeg in a big bowl - wisk well.
Layer the bacon, then spinach, then cheese inside the pie crust. Pour egg mixture over the top. Bake for 35-45 minutes (mine took 40) until top is starting to just brown. The center of your quiche may still wobble a bit, but it should set up as it sits to cool slightly.

*I'm still learning to read labels. I still had pre-made pie crusts in the fridge from another quiche I made a week ago. I finally picked up the box and read the ingredient list. Ugh... I am glad I did. You can now add "pie crusts" to my list of things I won't buy in the store any more. Unless I can find them without "Partially Hydrogenated Lard"?! *gag* It also had food coloring in it - why?? And then a few other things I couldn't decipher or pronounce. Pie crusts are not that hard to make... especially if you have a nice large food processor. It's amazing what people are willing to sacrifice in the name of convenience and time saving. Or maybe they just haven't taken the time to read the labels... like me? It only took me... until now! (*Me... banging my head on the wall*) Lesson learned.


Sunday, May 9, 2010

Fresh Pasta with Butternut Squash


Happy Mother's Day to all of you! If you live on the East Coast like me, you spent the day braving chilly temperatures and unusually gusty winds. After over-enjoying an incredible gourmet Mother's Day brunch buffet, sleeping it all off with an hour long nap, I woke up craving some chilly weather comfort food. I didn't want anything too heavy, so I turned to this old favorite... Butternut squash that is braised with butter and broth and lightly sweetened with sugar. The flavor of the sage and nutmeg are perfect compliments to this dish.

Fresh Pasta with Butternut Squash
and Brown Butter Sage Sauce
Adapted from Williams-Sonoma

  • 8 TBSP of Butter
  • 2 lbs of Butternut Squash, peeled, seeded, cut into 1" square (or buy prepackaged fresh cut squash)
  • 2 TBSP of Sugar
  • 1/2 cup of Chicken Broth (or vegetable broth to keep this a vegetarian dish)
  • 1/2 tsp salt, 1/4 tsp pepper
  • 1/2 medium Onion, diced
  • 1/8 tsp grated nutmeg
  • 1 TBSP minced fresh sage (or 1/2 TBSP dried)
  • 1 tsp fresh lemon juice
  • 2 TBSP minced fresh parsley (1 TBSP dried)
  • 1, 12 oz package of fresh pasta sheets, cut into 1" ribbons (I used "lasagna sheets")
  • fresh parmesan cheese, grated
  • 1/4 cup pine nuts, toasted

Begin a pot of salted water to boil for the pasta while you make the sauce.

In a heavy bottomed pot or wide skillet, melt 3 TBSP of butter. Add squash in a single layer; cook, without stirring, about 6 minutes. Stir squash, cook 4 minutes more. Add sugar, broth, salt and pepper. Cover and cook 2-3 minutes. Uncover; cook, stirring occasionally 2-3 minutes more. Transfer to a bowl.

In the same pot/skillet, over medium-high heat, melt 5 TBSP of butter. Cook onions, nutmeg, and sage for 1-2 minutes. Take off the heat, add lemon juice and parsley. And return squash to pot. Cover and keep warm.

Cook pasta ribbons for 5 minutes, or to package instructions. Drain, reserving 1/2 cup of the pasta water. Add pasta and reserved water to the squash; toss to combine. Transfer pasta to plates, top with fresh grated parmesan and sprinkle with pine nuts.

*If you can't find fresh pasta sheets, try fresh cheese raviolis. **This is also wonderful with grilled chicken apple sausage, sliced and mixed in with the pasta!

Thursday, May 6, 2010

Quinoa Salad with Chickpeas


For those of you not familiar with this wonderful rice and pasta alternative, Quinoa (pronounced Keen-wa) is a grain-like plant grown for it's edible seeds. Quinoa originated in South America where it had been an important part of the Inca diet 6,000 years ago. It is prized for it's high-protein content, which makes it a great staple for the vegetarian diet. It is also gluten-free, for those dealing with wheat sensitivities. So many reasons to love this stuff! It also has a wonderful nutty flavor and can be mixed with so many different things... it can serve as a side dish, main dish, or even as a breakfast cereal mixed with honey, almonds, and milk! Yum!

Quinoa Salad with Chickpeas, Cherries, and Goat Cheese

Ingredients:
  • 1 1/2 Cups Quinoa, rinsed (or buy a 12 oz box of pre-rinsed)
  • 1 Can chickpeas, rinsed and drained
  • 3/4 Cup dried Cherries
  • 1 red bell pepper, diced small
  • ------dressing-------------
  • 1/4 Cup Olive Oil
  • 2 TBSP red wine vinegar
  • 1 TBSP honey
  • 1 tsp mustard
  • 2 tsp salt
  • pepper to taste
  • ---top just before serving----
  • 4 oz of goat cheese, crumbled (you could use feta, if preferred)
Directions:
Bring a medium pot of water to a boil, add quinoa, and turn down to a simmer (covered) for 10 minutes. Drain over a fine mesh sieve and spread over a large baking sheet to cool and dry. If you don't have a mesh strainer, you can line a regular strainer with paper towels as a substitute.

Combine Quinoa in a large bowl with chickpeas, cherries, and peppers. Mix your dressing and pour over quinoa. You can serve this immediately or chill in a covered container until needed. Don't add your cheese until right before serving.